Invite Users & Assign Roles
Invite team members and assign Admin, Editor, or Viewer.
In Respeak, you work together with your team inside a workspace. You can invite colleagues and control what each person is allowed to do.
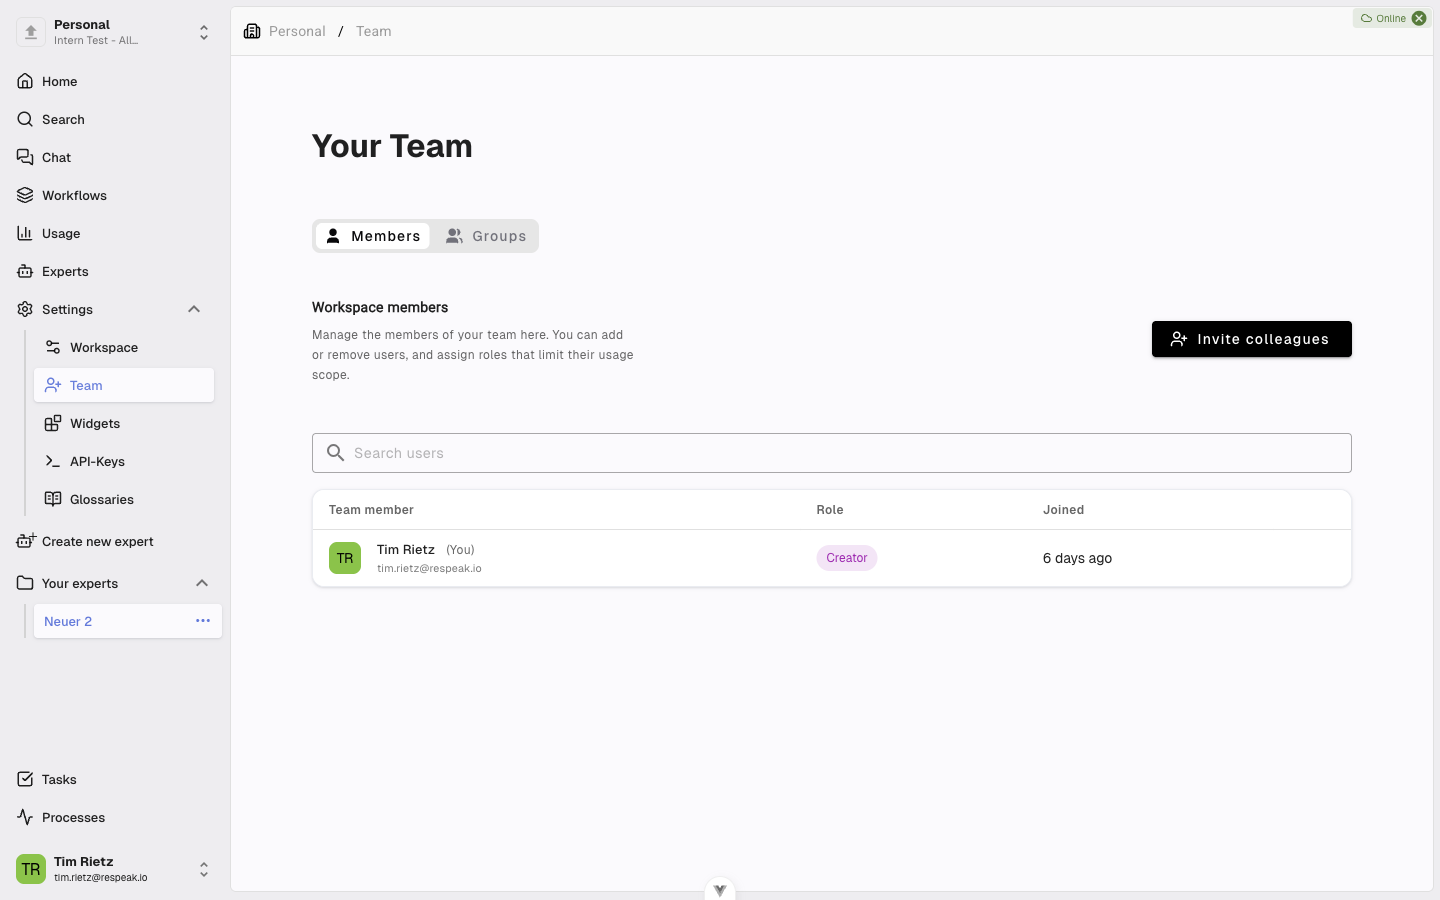
Open the Team Settings
Open Settings
Open your workspace and click Settings in the sidebar.
Select the Team tab
Select the Team tab.
You will see a table of everyone who has access to your workspace. For each person, the table shows their name, email address, assigned role, and the date they joined. Pending invitations also appear in this list, marked with an envelope icon.
Use the search field above the table to find specific people.
Invite New Users
Start the invitation
Click the Invite colleagues button (top right).
Enter email addresses
In the Work email(s) field, enter the email address of the person you want to invite. You can also enter multiple addresses separated by commas.
Choose a role
Under Role, select the appropriate role for the invited person.
Send the invitation
Click Invite colleagues. The invited person will receive an email with a link to join the workspace.
The Four Base Roles
Every user is assigned exactly one base role. It determines what the person can generally do within the workspace.
Role | Description |
|---|---|
Owner | Full control over the entire workspace, including billing and deletion. |
Admin | Can manage users, change settings, and access all features. Cannot delete the workspace itself. |
Member | Can actively contribute, for example by creating experts and adding sources. Cannot manage users or change settings. |
Viewer | Read-only access. Can view content but cannot make any changes. |
When inviting someone, you can only assign roles that are equal to or lower than your own role.
Additional Permissions
Beyond the base role, you can grant individual users specific additional permissions, for example for Glossaries, Widgets, Workflows, Groups, Notifications, as well as Chat Access and Search Access.
For the complete list of permissions and an in-depth comparison of the base roles, see Roles and Permissions in Detail.
If a user has additional permissions, a small number badge appears next to their role in the team table. Hover over it to see the individual permissions.
Example: Granting Chat Access to a User
Say a person has the base role Viewer and should additionally be able to use the chat. Here is how to grant the permission:
Open the Team page
Go to Settings → Team.
Select the user
In the row of the person you want to adjust, click the three-dot menu on the right and choose Manage Permissions.
Filter for "Chat"
On the new page, type Chat into the search field at the top, or click the category filter chip labeled Chat.
Check "Chat Access"
Tick the Chat Access checkbox under the Member category.
Check the Effective Permissions
Further down, you will find the Effective Permissions section. Chat Access should now appear there. Use this section to confirm the permission has actually taken effect.
Save changes
Click Save Changes. From now on, the user can see and use the chat.
"Chat Access" appears three times - is that a bug?
No. On the permissions page you will see "Chat Access" listed under Owner, Admin, and Member - once in each. That is because Chat Access is included in all three base roles by default, and the page shows you, for each role level, which permissions already belong to it.
It is still one and the same permission. A single checkmark - no matter under which level you set it - assigns the Chat Access right to the user. You can always verify this under Effective Permissions.
The same pattern applies to other permissions that multiple roles include by default, for example Search Access or Workflow Viewer.
You grant Search Access the same way - just filter by the Search category. By default, all roles (including Viewer) can use search. You can revoke it individually if someone should only use certain workspace features without searching expert knowledge bases.
Change a Role
Open the menu
Click the three-dot menu to the right of the user in the team table.
Select the new role
Select the desired new role (e.g. Make admin or Make viewer).
Adjust additional permissions (optional)
To adjust additional permissions, select Manage Permissions from the same menu.
Remove a User
Open the menu
Click the three-dot menu next to the user.
Remove the member
Select Remove Member and confirm the action in the dialog that appears.
If the user owns any content (e.g. experts) in the workspace, you will be asked whether that content should also be deleted.
Revoke a Pending Invitation
If an invited person has not yet joined the workspace, you can revoke the invitation at any time. Click the three-dot menu next to the invitation and select Cancel Invitation.