Team & Permissions
Invite team members and assign roles.
Running a dialog is rarely a one-person job. Under Team & permissions you can invite colleagues, give each the right level of access, and keep track of who's on board. Open it from the Team entry while a dialog is open — Invite new members and manage permissions.
Invite a team member
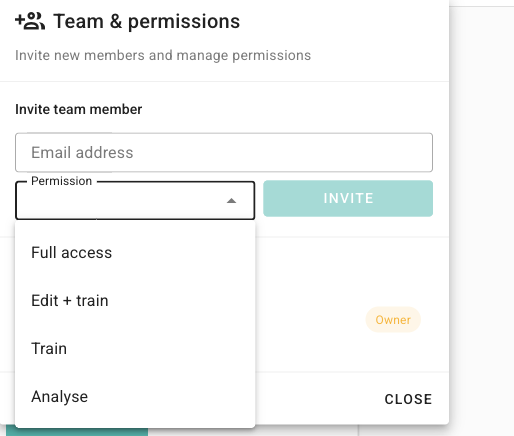
Open Team & permissions
Select Team to open the Team & permissions panel.
Enter their email
Under Invite team member, type the colleague's Email address.
Choose a permission
Pick a Permission from the list (you must select one to continue), then click Invite.
The person receives an invitation. Until they accept, they appear in your members list marked Invitation pending — click Resend if it needs another nudge.
What each role can do
Each member gets one Permission. The roles build on one another, from analysing only up to full control:
Role | What it allows |
|---|---|
Owner | Full control of the dialog, including managing the team and permissions. |
Full access | Work across the whole dialog — build, train, test, share, and analyse. |
Edit + train | Edit the dialog and train the bot. |
Train | Train the bot on participants' answers. |
Analyse | View and explore the results, without editing the dialog. |
Choose the lightest role that lets someone do their job. A colleague who only reviews results needs Analyse, not Full access.
Manage your team
The Team members section lists everyone with access. Your own entry is marked You, and pending invites show the Invitation pending label with a Resend option. Click Close when you're done.
Multichats: add to all linked dialogs
If you're working in a multichat, you can grant access to every linked dialog in one step. When inviting, tick Add user to all dialogs in this multichat so the person doesn't have to be added to each one individually.
What's next
With your team in place, your published dialog is ready to collect responses — see Publish & Share Your Link if you haven't gone live yet, then dive into the results in Analyse.